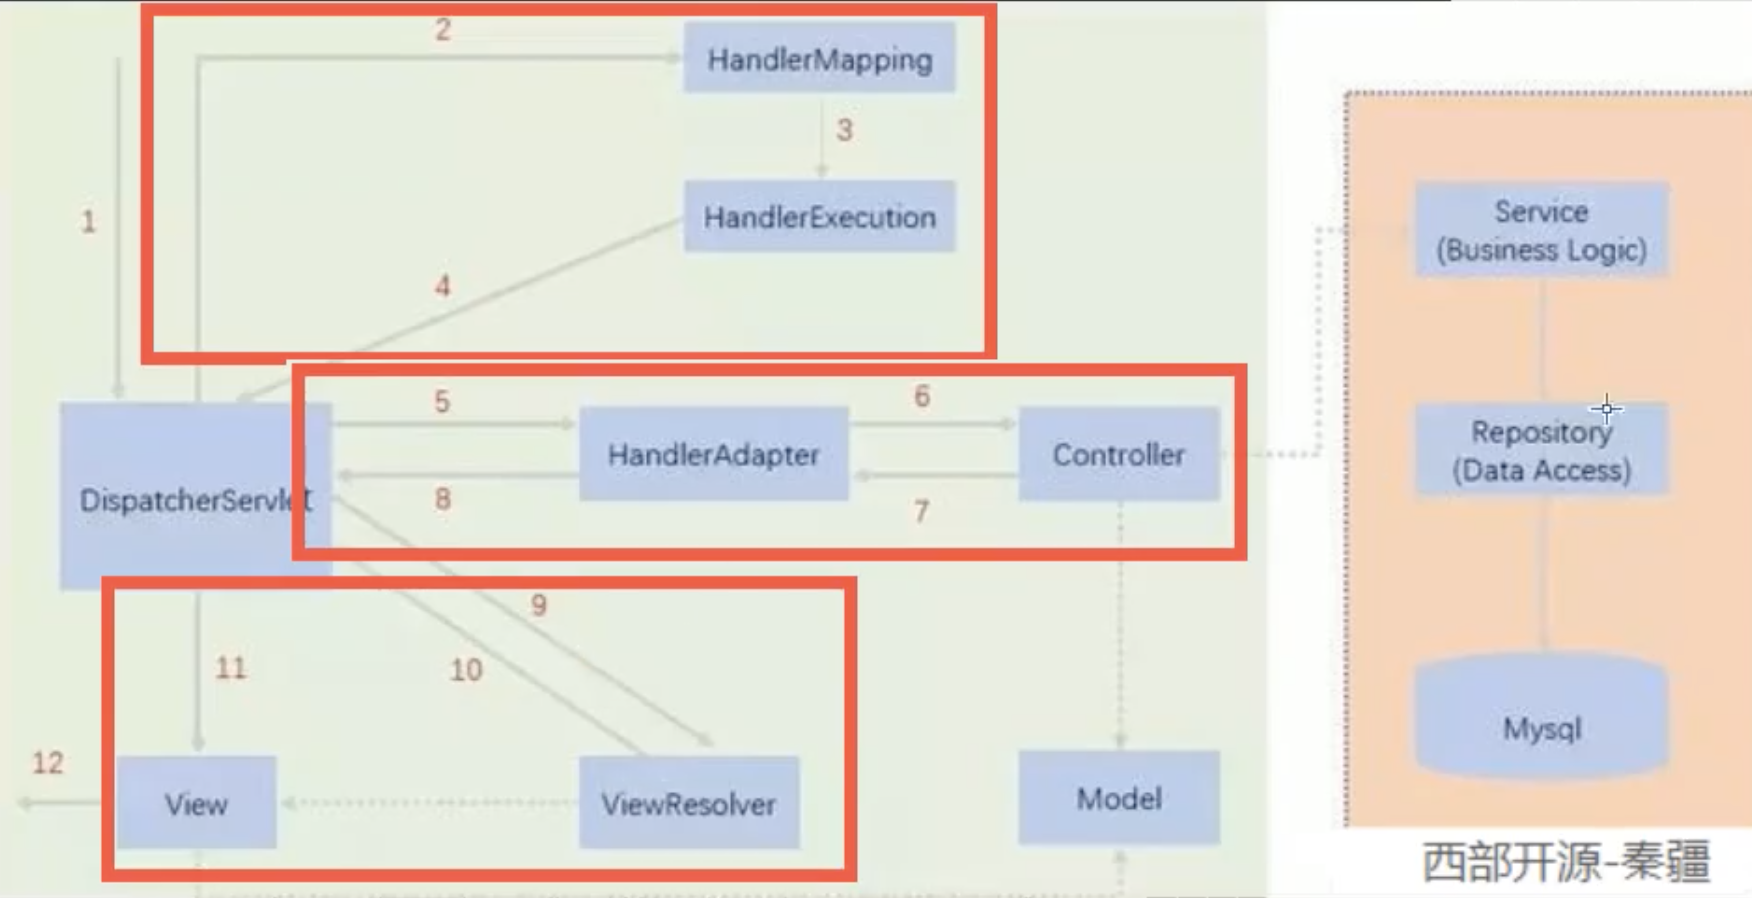
The Spring Web model-view-controller (MVC) framework is designed around a DispatcherServlet that dispatches requests to handlers, with configurable handler mappings, view resolution, locale and theme resolution as well as support for uploading files. The default handler is based on the @Controller and @RequestMapping annotations, offering a wide range of flexible handling methods. With the introduction of Spring 3.0, the @Controller mechanism also allows you to create RESTful Web sites and applications, through the @PathVariable annotation and other features.
Hello World
项目需要如下的包.
<dependencies>
    <!--Junit-->
    <dependency>
        <groupId>junit</groupId>
        <artifactId>junit</artifactId>
        <version>4.12</version>
    </dependency>
    <!--数据库驱动-->
    <dependency>
        <groupId>mysql</groupId>
        <artifactId>mysql-connector-java</artifactId>
        <version>5.1.47</version>
    </dependency>
    <!--数据库连接池-->
    <dependency>
        <groupId>com.mchange</groupId>
        <artifactId>c3p0</artifactId>
        <version>0.9.5.2</version>
    </dependency>

    <!--Servlet-JSP -->
    <dependency>
        <groupId>javax.servlet</groupId>
        <artifactId>servlet-api</artifactId>
        <version>2.5</version>
    </dependency>
    <dependency>
        <groupId>javax.servlet.jsp</groupId>
        <artifactId>jsp-api</artifactId>
        <version>2.2</version>
    </dependency>
    <dependency>
        <groupId>javax.servlet</groupId>
        <artifactId>jstl</artifactId>
        <version>1.2</version>
    </dependency>

    <!--Mybatis-->
    <dependency>
        <groupId>org.mybatis</groupId>
        <artifactId>mybatis</artifactId>
        <version>3.5.2</version>
    </dependency>
    <dependency>
        <groupId>org.mybatis</groupId>
        <artifactId>mybatis-spring</artifactId>
        <version>2.0.2</version>
    </dependency>

    <!--Spring-->
    <dependency>
        <groupId>org.springframework</groupId>
        <artifactId>spring-webmvc</artifactId>
        <version>5.1.9.RELEASE</version>
    </dependency>
    <dependency>
        <groupId>org.springframework</groupId>
        <artifactId>spring-jdbc</artifactId>
        <version>5.1.9.RELEASE</version>
    </dependency>
</dependencies>
controller代码如下, 实现Controller接口. 返回的ModelAndView实例
public class HelloController implements Controller {

    public ModelAndView handleRequest(HttpServletRequest request, HttpServletResponse response) throws Exception {
        ModelAndView mv = new ModelAndView();
        //这里写业务层代码
        mv.addObject("msg", "HelloSpringMVC!");
        mv.setViewName("hello");
        return mv;
    }
}
在resource目录下新建springmvc-servlet.xml. /WEB-INF/jsp/和.jsp是前缀和后缀, 所以这个目录下放一个名为hello的jsp文件, 就可以在文件中用{msg}去获取HelloSpringMVC!字符串. InternalResourceViewResolver就是视图解析器, 解析ModelAndView的数据, 并拼接视图数据.
<?xml version="1.0" encoding="UTF-8"?>
<beans xmlns="http://www.springframework.org/schema/beans"
       xmlns:xsi="http://www.w3.org/2001/XMLSchema-instance"
       xsi:schemaLocation="http://www.springframework.org/schema/beans
       http://www.springframework.org/schema/beans/spring-beans.xsd">

    <!--映射器-->
    <bean class="org.springframework.web.servlet.handler.BeanNameUrlHandlerMapping"/>
    <!--适配器-->
    <bean class="org.springframework.web.servlet.mvc.SimpleControllerHandlerAdapter"/>
    <!--视图解析器-->
    <bean class="org.springframework.web.servlet.view.InternalResourceViewResolver" id="InternalResourceViewResolver">
        <property name="prefix" value="/WEB-INF/jsp/"/>
        <property name="suffix" value=".jsp"/>
    </bean>

    <bean id="/hello" class="com.kuang.controller.HelloController"/>
</beans>
web.xml中包含了DispatcherServlet前置控制器, 是SpringMVC的控制中心. 而<servlet-mapping>则是去找映射器. </url-pattern>中一般为/, 表示只匹配请求, 如果为/*, 就会匹配所有文件(包括jsp文件).
<?xml version="1.0" encoding="UTF-8"?>
<web-app xmlns="http://xmlns.jcp.org/xml/ns/javaee"
         xmlns:xsi="http://www.w3.org/2001/XMLSchema-instance"
         xsi:schemaLocation="http://xmlns.jcp.org/xml/ns/javaee http://xmlns.jcp.org/xml/ns/javaee/web-app_4_0.xsd"
         version="4.0">
    <servlet>
        <servlet-name>springmvc</servlet-name>
        <servlet-class>org.springframework.web.servlet.DispatcherServlet</servlet-class><!--spring提供的类-->
        <init-param>
            <param-name>contextConfigLocation</param-name>
            <param-value>classpath:springmvc-servlet.xml</param-value>
        </init-param>
        <load-on-startup>1</load-on-startup>
    </servlet>

    <!--SpringMVC拦截所有请求-->
    <servlet-mapping>
        <servlet-name>springmvc</servlet-name>
        <url-pattern>/</url-pattern>
    </servlet-mapping>
</web-app>
新建maven项目时, 我们可以见一个没有模板的项目, 再在module上右键选择
add framework support, 选择webapp的版本(通常为4)
在
WEB-INF文件夹下可能没有lib文件夹, 导致网页404, 手动在project structure中新建lib文件夹并把包导入即可
注解版Hello World
web.xml配置文件不变, 改动在springmvc-servlet.xml.
<?xml version="1.0" encoding="UTF-8"?>
<beans xmlns="http://www.springframework.org/schema/beans"
       xmlns:xsi="http://www.w3.org/2001/XMLSchema-instance"
       xmlns:context="http://www.springframework.org/schema/context"
       xmlns:mvc="http://www.springframework.org/schema/mvc"
       xsi:schemaLocation="http://www.springframework.org/schema/beans
   http://www.springframework.org/schema/beans/spring-beans.xsd
   http://www.springframework.org/schema/context
   http://www.springframework.org/schema/context/spring-context.xsd
   http://www.springframework.org/schema/mvc
   https://www.springframework.org/schema/mvc/spring-mvc.xsd">

    <!--扫描包, 让指定包的注解生效, 由ioc容器统一管理-->
    <context:component-scan base-package="com.kuang.controller"/>
    <!--让SpringMVC不处理静态资源-->
    <mvc:default-servlet-handler/>
    <!--
        在上下文注入DefaultAnnotationHandlerMapping和AnnotationMethodHandlerAdapter实例
    -->
    <mvc:annotation-driven/>

    <bean class="org.springframework.web.servlet.view.InternalResourceViewResolver" id="InternalResourceViewResolver">
        <property name="prefix" value="/WEB-INF/jsp/"/>
        <property name="suffix" value=".jsp"/>
    </bean>
</beans>
在Controller中只需要用注解@RequestMapping映射uri即可. 类上也可以加入一级@RequestMapping注解, 再在方法上加入二级注解.
@Controller
public class HelloController {

    @RequestMapping("/hello")
    public String hello(Model model) {

        model.addAttribute("msg", "Hello");
        return "hello";
    }
}
有时候我们想传值给controller, 可以通过如下方式, 并访问http://localhost:8080/hello?a=1&b=1, 就可以看到输出结果.
@Controller
public class HelloController {

    @RequestMapping("/hello")
    public String hello(int a, int b, Model model) {
        int res = a + b;
        model.addAttribute("msg", "Hello " + res);
        return "hello";
    }
}
要满足RESTful风格, 就需要如下控制器, 并且访问http://localhost:8080/hello/1/2.
@Controller
public class HelloController {

    @RequestMapping("/hello/{a}/{b}")
    public String hello(@PathVariable int a, @PathVariable int b, Model model) {
        int res = a + b;
        model.addAttribute("msg", "Hello " + res);
        return "hello";
    }
}
还可以限制请求的类型, 比如@RequestMapping(value = "/hello/{a}/{b}", method = RequestMethod.GET), 或者直接通过注解@GetMapping限制. 所以就算url相同, 也可以通过请求方法的不同区分开.
在return的时候, 可以通过return "forward:/WEB-INF/jsp/hello.jsp";重定向, 通过return "redirect:/index.jsp";转发, 这样视图解析器就失效了, 不会去拼接前缀和后缀.
前端交互
获取请求参数
第一种方式是用@RequestParam("username"), 一般不省略. 第二种是直接传入对象, 但是对象的字段必须一一对应, 否则为null, 这里要注意, 如果对象的字段不是包装类型, 那么int型默认返回0, 所以pojo类通常都需要用包装类型.
@Controller
@RequestMapping("/user")
public class UserController {

    @GetMapping("/t1")
    public String test1(
            @RequestParam("username") String name,
            Model model) {
        System.out.println("name is" + name);
        model.addAttribute("msg", name);
        return "test";
    }

    @GetMapping("t2")
    public String test2(User user) {
        System.out.println(user);
        return "test";
    }
}
回显
一般用下面的三种类的实例进行数据的存储, 并回显
- Model: 简单存数据
- ModelMap: 继承了LinkMap, 所以有LinkedMap的特性
- ModelAndView: 可以设置返回的逻辑视图, 进行控制显示层跳转(一般不用)
乱码问题
前端有如下form进行输入时, 如果输入的是中文, 后端可能会拿到乱码.
<form action="/e/t1" method="post">
    <input type="text" name="name">
    <input type="submit">
</form>
以前的解决方案是重写一个过滤器, 实现Fliter接口, 并将请求和返回都配置上utf-8的编码. 而现在可以直接用springmvc的过滤器.
public class EncodingFilter implements Filter {

    @Override
    public void init(FilterConfig filterConfig) throws ServletException {

    }

    @Override
    public void doFilter(ServletRequest request, ServletResponse response, FilterChain chain) throws IOException, ServletException {
        request.setCharacterEncoding("utf-8");
        response.setCharacterEncoding("utf-8");
        chain.doFilter(request, response);
    }

    @Override
    public void destroy() {

    }
}
上面是我们实现的过滤器, 而下面是springmvc提供的过滤器.
<filter>
    <filter-name>encoding</filter-name>
    <filter-class>com.kuang.filter.EncodingFilter</filter-class>
</filter>
<filter-mapping>
    <filter-name>encoding</filter-name>
    <url-pattern>/*</url-pattern>
</filter-mapping>

<filter>
    <filter-name>encoding</filter-name>
    <filter-class>org.springframework.web.filter.CharacterEncodingFilter</filter-class>
    <init-param>
        <param-name>encoding</param-name>
        <param-value>utf-8</param-value>
    </init-param>
</filter>
<filter-mapping>
    <filter-name>encoding</filter-name>
    <url-pattern>/*</url-pattern>
</filter-mapping>
JSON
通常前后端可以通过JSON传输数据, 我们可以手动用ObjectMapper实现或者直接用fastjson等jar包提供的工具类来进行JSON的编码解码. 不走视图解析器就是说返回的并不是一个文件的路径, 而是一个对一个请求的响应, 那么这个方法就相当于一个服务的api了.
//@Controller + @ResponseBody = 不走视图解析器, 或直接RestController注解
@RestController
public class UserController {

//    @RequestMapping(value = "j1", produces = "application/json;charset=utf-8")
    @RequestMapping("j1")
    //@ResponseBody //不走视图解析器
    public String json1() throws JsonProcessingException {
        ObjectMapper mapper = new ObjectMapper();

        User user = new User("李四", 3, "男");
        String str = mapper.writeValueAsString(user);
        return str;
    }

    @RequestMapping("j2")
    public String json2() throws JsonProcessingException {
        ObjectMapper mapper = new ObjectMapper();

        User user1 = new User("李四", 3, "男");
        User user2 = new User("王五", 4, "男");
        List<User> list = new ArrayList<>();
        list.add(user1);
        list.add(user2);
        String str = mapper.writeValueAsString(list);
        return str;
    }

    @RequestMapping("j3")
    public String json3() throws JsonProcessingException {
        ObjectMapper mapper = new ObjectMapper();
        //方式2
        mapper.configure(SerializationFeature.WRITE_DATE_KEYS_AS_TIMESTAMPS, false);

        Date date = new Date();
        SimpleDateFormat sdf = new SimpleDateFormat("yyyy-MM-dd HH:mm:ss");

        //方式1
        //String str = mapper.writeValueAsString(sdf.format(date));

        //方式2
        mapper.setDateFormat(sdf);
        String str = mapper.writeValueAsString(date);
        return str;
    }

    @RequestMapping("j4")
    public String json4() {
        /**
         * 用fastjson(工具类)
         * json字符串->java对象
         * java对象->json对象
         * json对象->java对象
        **/
        User user1 = new User("李四", 3, "男");
        User user2 = new User("王五", 4, "男");
        List<User> list = new ArrayList<>();
        list.add(user1);
        list.add(user2);

        String str = JSON.toJSONString(list);
        return str;
    }
}
通过ssm整合项目进行练习. 我做实验的时候, 配置db.properties时的url去掉了?后的字段, 否则会编译失败.
Ajax
用jQuery做ajax请求其实非常简单, 我们写一个输入框, 当失去焦点时发送一个请求.
<%@ page contentType="text/html;charset=UTF-8" language="java" %>
<html>
  <head>
    <title>First</title>
    <script src="${pageContext.request.contextPath}/statics/js/jquery-3.6.0.js"></script>
    <script>
      function a() {
        $.post({
          url: "${pageContext.request.contextPath}/a1",
          data: {
            "name": $("#username").val()
          },
          success: function (data) {
            alert(data);
          }
        });
      }
    </script>
  </head>
  <body>

  user: <input type="text" id="username" onblur="a()">

  </body>
</html>
并在后端的controller中打印这个传过来的name, 这里可以出, "name": $("#username").val()中的key name才是后端拿到的字段名. 最后我们可以在浏览器调试窗口看到, a1的请求Type是xhr, 表示这是一个异步的请求.
@RestController
public class AjaxController {

    @RequestMapping("/a1")
    public void a1(String name, HttpServletResponse response) throws IOException {
        System.out.println(name);
        response.getWriter().print(name);
    }
}
后端也可以把数据传给前端, 比如在controller中把一个类直接传给前端.
@RequestMapping("/a2")
public List<User> a2() {
    ArrayList<User> list = new ArrayList<>();
    list.add(new User("张三", 1, "男"));
    list.add(new User("李四", 2, "女"));
    return list;
}
在前端中, 取data中的值, 并做成列表放在页面上.
<%@ page contentType="text/html;charset=UTF-8" language="java" %>
<html>
<head>
    <title>Title</title>
    <script src="${pageContext.request.contextPath}/statics/js/jquery-3.6.0.js"></script>
    <script>
        $(function() {
            $("#btn").click(function () {
                $.post("${pageContext.request.contextPath}/a2", function (data) {
                    console.log(data);
                    var html = "";
                    for (let i = 0; i < data.length; i++) {
                        html += "<tr>" +
                            "<td>" + data[i].name + "</td>" +
                            "<td>" + data[i].age + "</td>" +
                            "<td>" + data[i].gender + "</td>" +
                            "</tr>";
                    }
                    $("#content").html(html);
                });
            });
        });
    </script>
</head>
<body>

<input type="button" value="load data" id="btn">
<table>
    <tr>
        <td>name</td>
        <td>age</td>
        <td>gender</td>
    </tr>
    <tbody id="content">

    </tbody>
</table>

</body>
</html>
拦截器
SpringMVC的拦截器只拦截controller方法, 也是应用了aop的思想. 通过实现HandlerInterceptor接口来完成拦截器的功能. 方法分别对对应处理前/处理后/清理三步. 其中处理前是一个返回为boolean的方法, 为true才会继续执行controller方法, 可通过这个拦截器选择是否继续执行. 通过拦截器, 可以实现对登陆权限等的拦截, 注意要检测是否有session, 在注销的时候移除session.
public class MyInterceptor implements HandlerInterceptor {

    @Override
    public boolean preHandle(HttpServletRequest request, HttpServletResponse response, Object handler) throws Exception {
        System.out.println("preHandle");
        return true;
    }

    @Override
    public void postHandle(HttpServletRequest request, HttpServletResponse response, Object handler, ModelAndView modelAndView) throws Exception {
        System.out.println("postHandle");
    }

    @Override
    public void afterCompletion(HttpServletRequest request, HttpServletResponse response, Object handler, Exception ex) throws Exception {
        System.out.println("afterCompletion");
    }
}
文件上传/下载
SpringMVC可以让我们方便地实现文件上传和下载, 需要在maven中加入如下配置.
<dependency>
    <groupId>commons-fileupload</groupId>
    <artifactId>commons-fileupload</artifactId>
    <version>1.3.3</version>
</dependency>
controller类实现了两种上传方法和一种下载方法.
@Controller
public class FileController {

    //@RequestParam("file")将name=file控件得到的文件封装成CommonsMultipartFile对象, 批量上传CommonsMultipartFile则为数组即可
    @RequestMapping("/upload")
    public String fileUpload(@RequestParam("file") CommonsMultipartFile file, HttpServletRequest request) throws IOException {

        //获取文件名
        String uploadFileName = file.getOriginalFilename();

        if ("".equals(uploadFileName)){
            return "redirect:/index.jsp";
        }
        System.out.println("filename: "+uploadFileName);

        //上传路径保存设置
        String path = request.getServletContext().getRealPath("/upload");
        File realPath = new File(path);
        if (!realPath.exists()){
            realPath.mkdir();
        }
        System.out.println("dir: "+realPath);

        InputStream is = file.getInputStream(); //文件输入流
        OutputStream os = new FileOutputStream(new File(realPath,uploadFileName)); //文件输出流

        //读取写出
        int len=0;
        byte[] buffer = new byte[1024];
        while ((len=is.read(buffer))!=-1){
            os.write(buffer,0,len);
            os.flush();
        }
        os.close();
        is.close();
        return "redirect:/index.jsp";
    }

    @RequestMapping("/upload2")
    public String fileUpload2(@RequestParam("file") CommonsMultipartFile file, HttpServletRequest request) throws IOException {

        String path = request.getServletContext().getRealPath("/upload");
        File realPath = new File(path);
        if (!realPath.exists()){
            realPath.mkdir();
        }
        System.out.println("dir: "+realPath);

        //通过CommonsMultipartFile的方法直接写文件
        file.transferTo(new File(realPath +"/"+ file.getOriginalFilename()));
        return "redirect:/index.jsp";
    }

    @RequestMapping(value="/download")
    public String downloads(HttpServletResponse response, HttpServletRequest request) throws Exception{
        //要下载的图片地址
        String path = request.getServletContext().getRealPath("/upload");
        String fileName = "IMG_5284.JPG";

        //设置response响应头
        response.reset(); //设置页面不缓存,清空buffer
        response.setCharacterEncoding("UTF-8"); //字符编码
        response.setContentType("multipart/form-data"); //二进制传输数据

        response.setHeader("Content-Disposition",
                "attachment;fileName="+ URLEncoder.encode(fileName, "UTF-8"));

        File file = new File(path, fileName);
        //读取文件输入流
        InputStream input = new FileInputStream(file);
        //写出文件输出流
        OutputStream out = response.getOutputStream();

        byte[] buff = new byte[1024];
        int index = 0;
        //写出
        while((index= input.read(buff))!= -1){
            out.write(buff, 0, index);
            out.flush();
        }
        out.close();
        input.close();
        return "ok";
    }
}
前端页面.
<%@ page contentType="text/html;charset=UTF-8" language="java" %>
<html>
  <head>
    <title>First</title>
  </head>
  <body>

  <form action="${pageContext.request.contextPath}/upload" enctype="multipart/form-data" method="post">
    <input type="file" name="file"/>
    <input type="submit" value="upload">
  </form>

  <a href="/download">点击下载</a>
  </body>
</html>
参考
comments powered by Disqus